To discuss Snowflake’s Best Practices in Data Engineering, we must first define Data Engineering.
Data engineering refers to the process of turning unusable data into information that can be used to support business decisions. Data is acquired, the raw data history is ingested, cleaned, restructured, and then enhanced by merging new qualities before being made ready for end-user consumption.
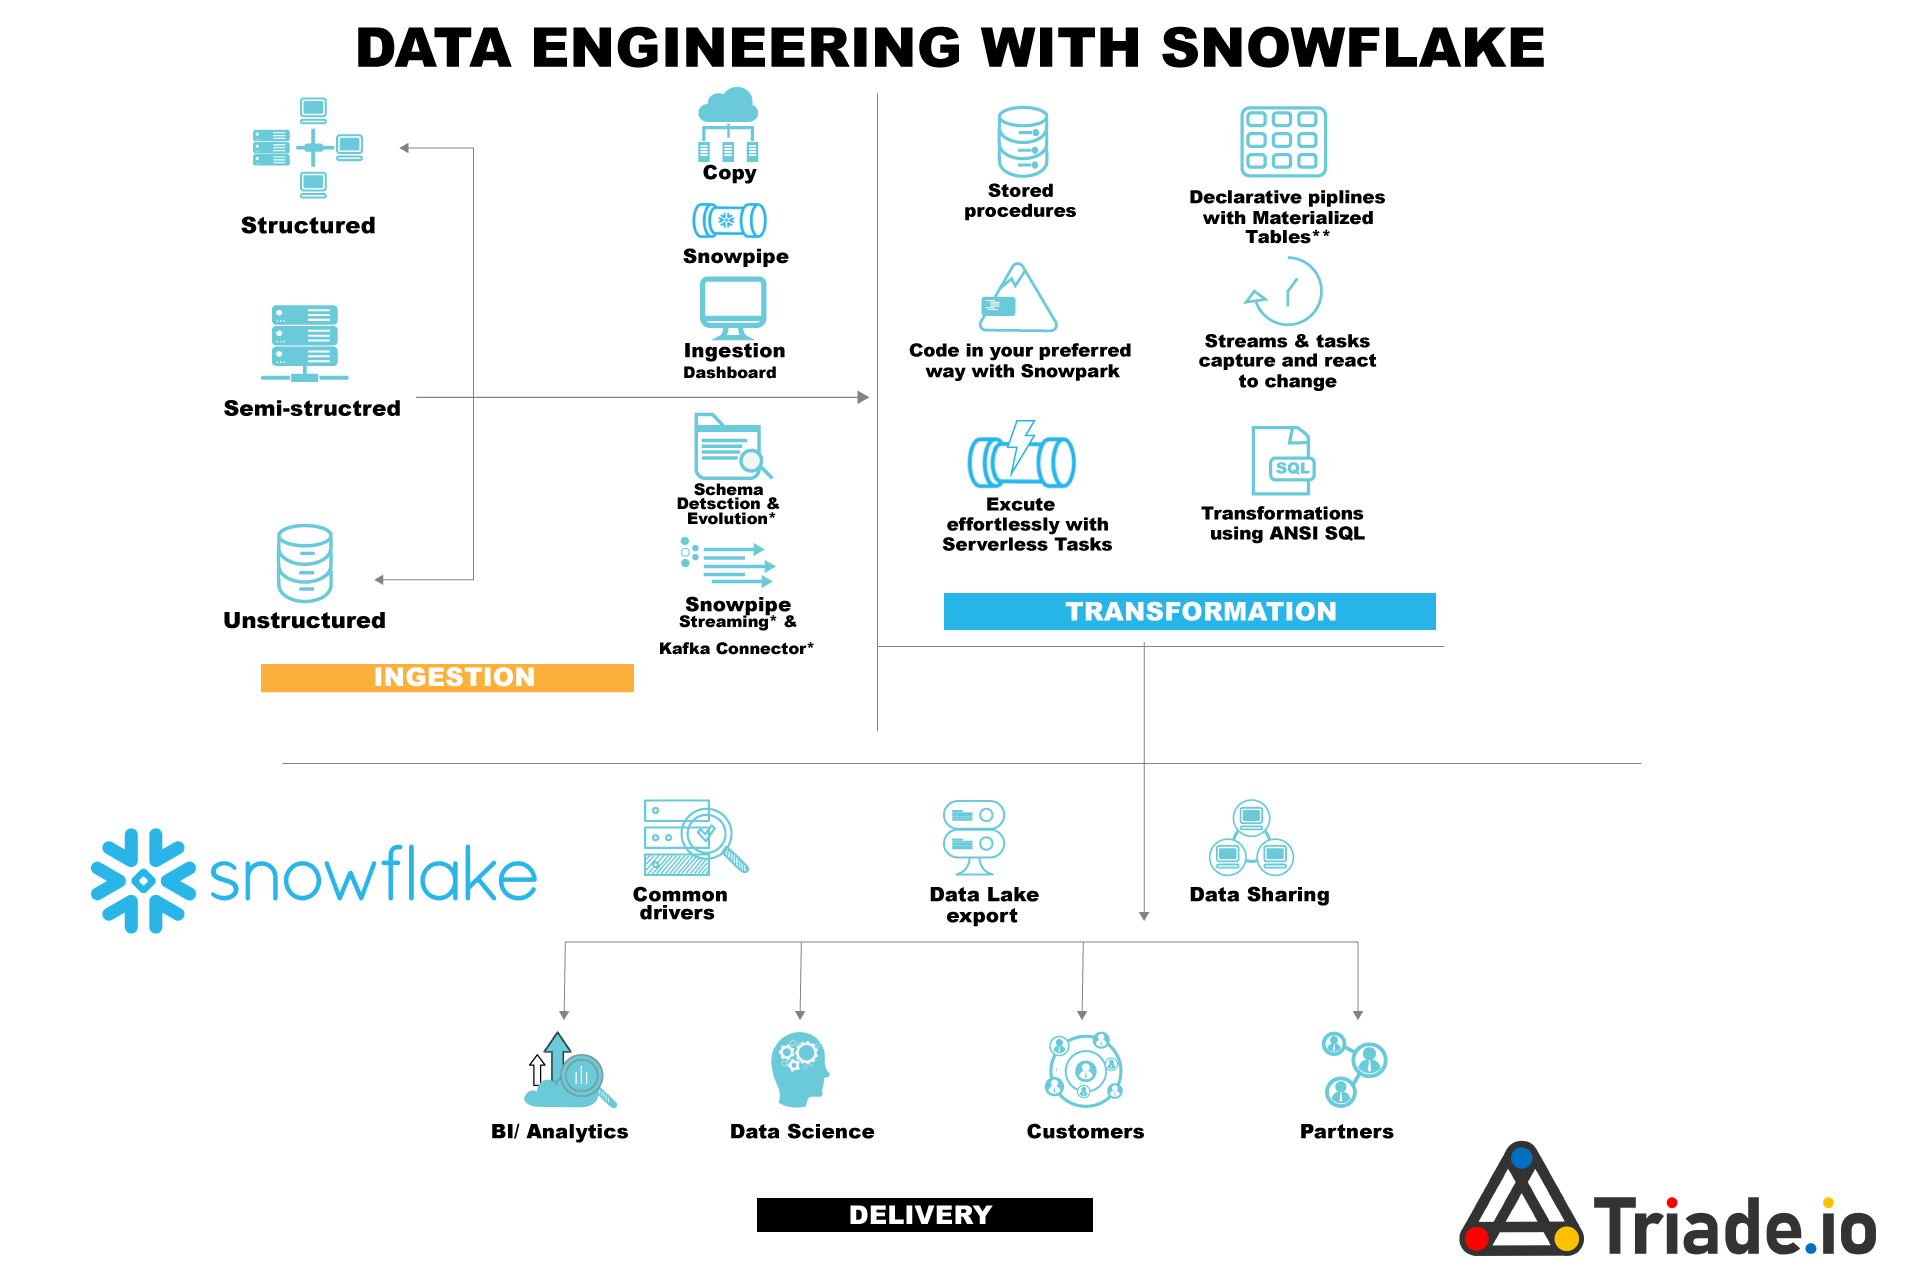
The components of data engineering are similar across all analytics platforms. We collected a range of best practices from our Snowflake-certified team and brought them to you below:
Data collection: this process is gathering the raw data files and putting them on cloud storage services like Amazon S3, Azure Blob, or Google Cloud Platform. Data is first loaded into a Snowflake table for ingestion and landing, after which it can be cleaned and altered.
Data should be loaded temporarily into a transitory table to balance the need for speed, resilience, simplicity, and cost-effective storage.
Raw history: it’s best practice to save the history of raw data to allow machine learning and data re-processing as necessary, unless the data is derived from a raw data lake.
Data integration: focuses on organizing and integrating the data once it has been cleaned up, enhanced with new properties, and restructured. The final results are often stored in Snowflake permanent tables, whereas intermediate results are typically kept in temporary or transient tables during the transformation process.
Data presentation and consumption: although the Data Integration area may store data in a Third Normal Form or in a Data Vault, it’s often a good idea to store data that is ready for consumption in denormalized tables.
A layer of views that serves as a semantic layer to shield users from the underlying table design can also be included in this region. Data management capabilities such as Role Based Access Control, sensitive data handling techniques like Dynamic Data Masking, and Row Level Security are referred to as “Data Governance, Security, and Monitoring.” This helps guarantee that the Snowflake platform is functioning well by keeping track of Snowflake usage and costs.
Let’s take a further look into the best practices of Snowflake in data engineering to optimize its use.
Snowflake: Best Practices to Adopt in Data Engineering
Snowflake is a highly popular, powerful tool for cloud data management. Great power also brings some risks. Errors can be quite expensive when dealing with vast amounts of data and data processing.
Triade Data Engineering With Snowflake
Traditional extract, transform, and load (ETL) emerged as a method for standardizing data preparation for meticulously organized enterprise data warehouses with a rigid, predetermined schema.
Organizations require new options for expediting and automating these processes with more adaptable and changing downstream schemas when it comes to investigating, organizing, blending, and cleaning enormous volumes of new, heterogeneous, less-structured data.
Data migration is becoming increasingly more necessary as businesses grow internationally and consumers access the internet on a variety of devices. The success of businesses depend on carefully planning, designing the data migration strategy, and diligent implementation of all technical and non-technical aspects of the process.
Consider a Snowflake migration if your database is big enough to create backups and restore time-consuming processes. If that’s the case, moving your database to the cloud will help you make the most of the resources there and lighten your workload locally.
Modern cloud data warehouses, like Snowflake, can function as a data lake with fewer restrictions on structured data and a predefined data warehouse schema. If your company concentrates on the appropriate data preparation use cases, Snowflake can bring benefits quicker. Let’s see how!
1. Make data warehouses capable of auto-suspension
You must configure your virtual warehouses to auto-suspend in order to stop credit use. When you choose this option, data warehouses will automatically shut down after processing queries.
When queries are finished processing, you can configure the warehouses that do not have auto-suspension to suspend.
2. Enable auto-resuming
In keeping with the aforementioned strategy, you should establish suitable time-out limits when you set virtual warehouses to automatically suspend and resume. Users won’t be able to query the system if you don’t use the auto-resume option.
To determine which warehouses don’t have auto-resume enabled, you must execute queries and also apply time restrictions as required.
3. Optimize your data models in Snowflake
The models will be properly tuned for Snowflake in the final step for quick and scalable execution by data engineers. Here are some methods for optimization:
- Utilizing virtual data warehouses is advised by Snowflake in order to manage various workloads effectively. Users should separate “loading” and “execution” into separate virtual data warehouses. Place use-specific data models in the corresponding virtual warehouse for your ETL’s raw data loading.
- Snowflake advises using materialized views to enhance performance for frequent and repetitive queries, and data transformation models meet this requirement wonderfully.
Also, you can create a query to look into your warehouses and verify services with costs representing a bigger fraction of the workload. Snowflake charges an account 10% of credit usage beyond the daily virtual warehouse credit limit. Making a query to look into increases above that limit can aid in limiting your credit usage to the daily allotment.
4. Remove any unused tables from the warehouses
The ideal candidates to be removed from the system are unused tables. Make sure no one is querying a table before removing it. Checking all the tables before deleting them is a smart idea. This advice is particularly useful from a database standpoint.
5. Set workload-appropriate timeouts
Every virtual data warehouse needs to have the proper timeouts enabled for each workload. For instance, retain timeouts for suspending them immediately after completion in warehouses participating in the task, data loading, and ETL/ELT.
Suspension timeout for BI and SELECT query warehouses should be limited to 10 minutes to keep data caches warm for frequent user access. Suspension timeout can be kept at 5 minutes for warehouses with DevOps, DataOps, and data science databases to prioritize ad hoc and highly unique requests over warm caches.
6. Maintain account statement timeouts
Queries that take a long time to execute due to a frozen cluster or user error can be automatically stopped by using account statement timeout parameters like queued timeout and timeout commands.
For your lengthy searches, you may even tailor the session, account, data warehouse, and user timeout settings based on your data plans.

Triade Snowflake Architecture
7. Check the weekly average of credit consumption
It might be challenging to maintain track of your credit usage history when working on extended projects, particularly when your credit limit is exceeded.
Making a query that examines your seven-day average credit utilization and identifies the weeks where the consumption exceeds the average is a helpful technique. This approach can help you learn more about the tasks that are taking place.
8. Model canonical data
The data engineering team can convert the raw data into canonical data models that represent particular subjects once the data has been entered into the CDW and has undergone the first pass of data transformation. Data models for accounts, contacts, leads, opportunities, activities are some examples. Canonical data models produce reusable, shared components for a variety of scenarios.
The canonical data models typically combine (JOIN, UNION, etc.) data from various objects to create a rich and comprehensive set of fields to represent the subject because the raw data that came from the data sources is frequently normalized. Additionally, some data may also be present in the canonical data models.
9. Query data suggestions
Snowflake helps you assign the Virtual Warehouse based on the verticals/departments so caching will be more efficient when querying the same data.
This increases the likelihood that information retrieved to the cache by one user will be used by other users as well. This cache will be removed if warehousing is suspended. Any query run by any user on the account will be delivered from the result cache as long as the SQL text is the same (because the result cache is maintained by the Global Services layer). Results are kept on file for one day.
We can also analyze queries that are being executed from Business Intelligence (BI) tools thanks to the Snowflake Query Profile functionality.
10. Observe the data type guidelines
Data types are crucial to take into account while replicating data because they vary greatly from one system to another. One incorrect data type might halt the entire data replication process and result in problems using the data downstream, such as the inability to utilize mathematical functions on text data types.
Pay attention to default encoding conventions; stay away from embedding characters in integer or float data types; and, if necessary, provide default precision scales. Observe the timestamp and date standards used worldwide.
When developing your data replication pipeline, whenever it is practical, promote subtypes into a parent type for typecasting in the data warehouse. Additionally, be sure to coordinate with analytics stakeholders to guarantee proper typecasting.
11. Plan for disaster recovery
Have a backup plan in place to restore your data in the event of a data replication issue, such as when integrating updated data into existing datasets, so that activities can continue as usual while the data replication process is being fixed.
The features that permit reversing data when this happens are often present in cloud data warehouses and data lake houses. For instance, Time Travel is a feature in Snowflake which allows your team’s time to roll back to the last known steady state of your data before sending your changes into production because each of these solutions has its own window for how long snapshots of data will be maintained in these systems.
If a user needs to access data that is older than the time-travel window, Snowflake has a failsafe data recovery process in place. The process starts with Snowflake’s Data Recovery Service, which allows users to recover data that has been deleted or lost due to human error, system failure, or other unforeseen circumstances.
The service is available for all Snowflake accounts and can be accessed through the Snowflake web interface or via the Snowflake API. When a user initiates a data recovery request, Snowflake begins by taking a snapshot of the entire account, including all databases, schemas, tables, and views. The snapshot is then stored in a secure, off-site location and can be used as a reference point for data recovery.
Once the snapshot has been taken, Snowflake’s recovery team begins the process of identifying and recovering the missing data. The team uses a combination of automated tools and manual techniques to locate and restore the data, ensuring that it is returned to the user in its original form.
The data recovery process typically takes between 3-7 days, depending on the amount of data that needs to be recovered and the complexity of the recovery. Snowflake’s recovery team works closely with the user to ensure that the data is returned as quickly as possible and that the recovery process is as seamless as possible.